Import Data from LastPass
Use this article for help exporting data from LastPass and importing into PassageWay.
Export from LastPass
You can export your data from LastPass from their Web Vault or from a LastPass Browser Extension:
Note
A previous version of this article stated that you needed to use the Browser Extension to export Form Fills (e.g. Addresses and Payment Cards), however testing by Bitwarden’s Customer Success team found that using either LastPass application to download a standard LastPass CSV will include Form Fills in your export.
From the LastPass Web Vault
To export your data from the LastPass Web Vault:
-
Select the Advanced Options option on the left sidebar:
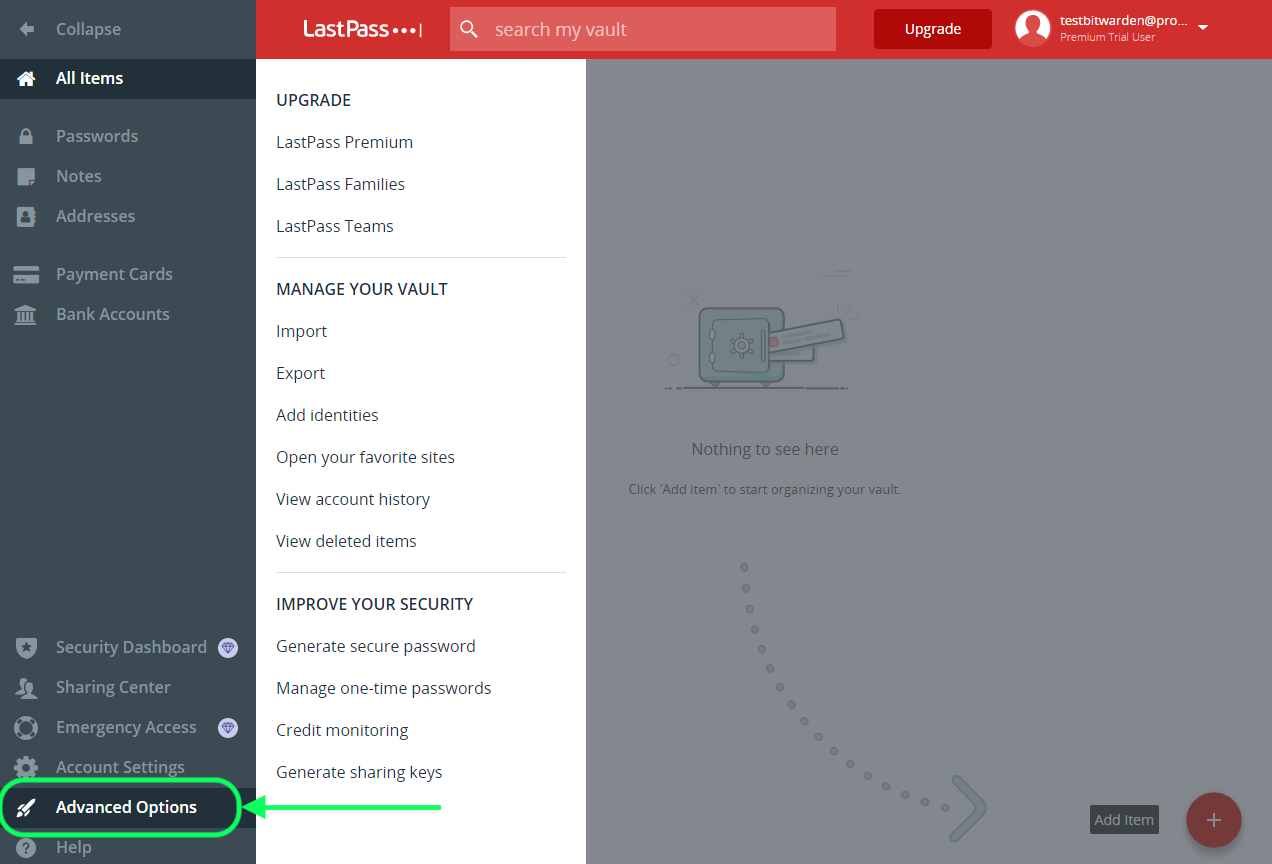
Export from Web Vault - From the Manage Your Vault section, select the Export option.
-
Enter your Master Password to validate the export attempt.
Depending on your browser, your Vault data will either be automatically saved as a
.csvor printed to the screen in a.csvformat:
LastPass Export - If your Vault data was printed to the screen, highlight the text and copy and paste it into a new
export.csvfile.
Warning
Some users have reported a bug which changes special characters in your passwords (&, <, >, etc.) to their HTML-encoded values (for example, &) in the printed export.
If you observe this bug in your exported data, use a text editor to find and replace all altered values before importing into PassageWay.
From a LastPass Browser Extension
To export your data from a LastPass Browser Extension:
-
In the Browser Extension, navigate to Account Options → Advanced → Export → LastPass CSV File:

Export from Browser Extension -
Enter your Master Password to validate the export attempt.
Depending on your browser, your Vault data will either be automatically saved as a
.csvor printed to the screen in a.csvformat:
LastPass Export -
If your Vault data was printed to the screen, highlight the text and copy and paste it into a new
export.csvfile.
Import to PassageWay
Importing data to PassageWay can only be done from the Web Vault or CLI. Data is encrypted locally before being sent to the server for storage. To import your data:
- In the Web Vault, select Tools from the top navigation bar.
- Select Import Data from the left-hand Tools menu.
-
From the format dropdown, choose LastPass (csv) from the File Format dropdown.
-
Select the Choose File button and add the file to import or copy/paste the contents of your
.csvinto the input box.Warning
Import to PassageWay can’t check whether items in the file to import are duplicative of items in your Vault. This means that importing multiple files will create duplicative Vault items if an item is already in the Vault and in the file to import.
- Select the Import Data button to complete your import.
- After successful import, delete the source
.csvfile from your computer. This will protect you in the event your computer is compromised.
Currently, file attachments are not included in PassageWay import operations and will need to be uploaded to your Vault manually. For more information, see File Attachments.
Import Troubleshooting
Length-related Import Errors
The following error messages, typically received when attempting to import a .csv, indicate that an item in your import file has a specified value that exceeds the allowed encrypted character limit for its field type:

To solve this issue, open the .csv file in a text editor or spreadsheet program and remove or reduce the character count of the offending item. PassageWay won’t import your .csv file until it is free of offenses. The contents of the error messages contain several pieces of pertinent data to help you identify the offending item. For example, in the above example:
[1]identifies the index number where the offending item is located, adjusted to match row numbering in most spreadsheet programs.[Login]identifies the Vault itemtypeof the offending item."Facebook"identifies thenameof the offending item.Notesindicates the field (column) where the character limit is exceeded.-
10000indicates the character limit allowed for that field (column).Tip
On import to PassageWay, the character count of any given field is increased due to encryption, meaning that an 8000-character
Notesfield in your.csvwill scale to 10,000+ characters when it comes into contact with PassageWay, triggering this error. As a rule of thumb, character counts will grow between 30-50% when encrypted.
If you continue to have trouble locating the offending item using the data provided in the error, it may help to focus first on notes as these are frequently the cause of this error.
url,username,password,totp,extra,name,grouping,fav
https://www.facebook.com/login.php,username,password,,,Facebook,Social,0
https://twitter.com/login,username,password,,,Twitter,Social,0
https://asana.com/,login,password,,,Asana,Productivity Tools,0
https://github.com/login,username,password,,,Github,Productivity Tools,0
https://www.paypal.com/login,username,password,,,Paypal,Finance,0
https://www.bankofamerica.com/,username,password,,,Bankofamerica,Finance,0
To solve this issue, delete the grouping column and the grouping datum for each item, including the trailing comma, for example edit:
https://github.com/login,username,password,,,Github,Productivity Tools,0
down to:
https://github.com/login,username,password,,,Github,0